Webinars and Video Conferences in Full HD with the Janus WebRTC Gateway
Please keep an eye on this tutorial as it will be being kept updated frequently whenever any new functionalities are added.
The Janus WebRTC Gateway is a general purpose lightweight server implementing the means to set up WebRTC media communications between peers. In many ways, Janus is similar to Jitsi (as examined in the previous example). Janus is so light that can easily scale to the Raspberry Pi!
UPDATE: In the past there was a ready-to-use OS image for Raspberry Pi with both Janus and UV4L preinstalled in the system that you could flash onto a SD card and immediately try out to entirely host or join any video conferences locally or remotely over the web. That image has now become obsolete so it is no longer available for download (sorry), so you’ll have to install Janus on the Raspberry Pi by yourself if you want a complete, standalone solution for videoconferencing, otherwise just use UV4L to connect to a third-party Janus instance as shown below.
Janus is also extremely powerful in that it is highly customizable and offers some unique features like video room recording & playback, codec & bitrate selection, live data, audio and video, stream forwarding to a RTP server, and so on…
The description of the simple interface which follows is meant for final users, while for the developers who want to write their native applications by using UV4L as back-end for creating and driving Janus sessions with greater detail, please refer to the RESTful API documentation supported by UV4L. These two interfaces are independent and cannot be mixed together.
We will not see how to build, install and configure Janus in this tutorial, as this is well explained in the official Janus documentation, so from now on we’ll be assuming that there exists one instance of Janus already deployed somewhere (there is indeed one public video room available here, which may be useful for testing purposes).
Just a few clarifications before starting: in the WebRTC world a peer is usually a browser, but not necessarily, as in this case. In facts, thanks to the UV4L’s native support for WebRTC, it’s possible to directly turn a Raspberry Pi optionally equipped with camera, microphone, speakers and display into a full WebRTC-compliant peer, being able to connect to a given Janus Gateway instance “in the cloud” and create or join a any given video room, for publishing your own live feed and/or subscribing to audio, video and data live feeds from other participants in the room (of course, any other participant in the room is free to use a Raspberry Pi rather than a browser). This publish/subscribe pattern allows the realization of several different scenarios, ranging from simple webinars (one speaker, several listeners) to fully meshed video conferences (each peer sending and receiving to and from all the others)! Again, there is no need of any browser installed on the Raspberry Pi. There is also no need of a X server or GUI to display the video from the other participants.
Before proceeding, it’s necessary to install the required packages, which are: uv4l, uv4l-server, uv4l-webrtc, and one video driver (e.g. uv4l-raspicam, uv4l-uvc, etc…). Please refer to these installation instructions for more details.
To start and stop streaming to a particular room, it’s enough to invoke the corresponding commands by means of the UV4L Streaming Server installed on the Raspberry Pi. This can be done in two ways.
The first convenient way is through a browser (e.g. on a PC or smartphone) by using the Janus control page available at the URL where the Streaming Server itself is running (e.g. http://myraspberrypi:8080). In this web page it’s possible to insert all the mandatory fields (e.g. gateway URL, room, pin, username, etc…) required to establish a connection and to start or stop a session in order to join or leave the specified room respectively. The page should look similar to this:
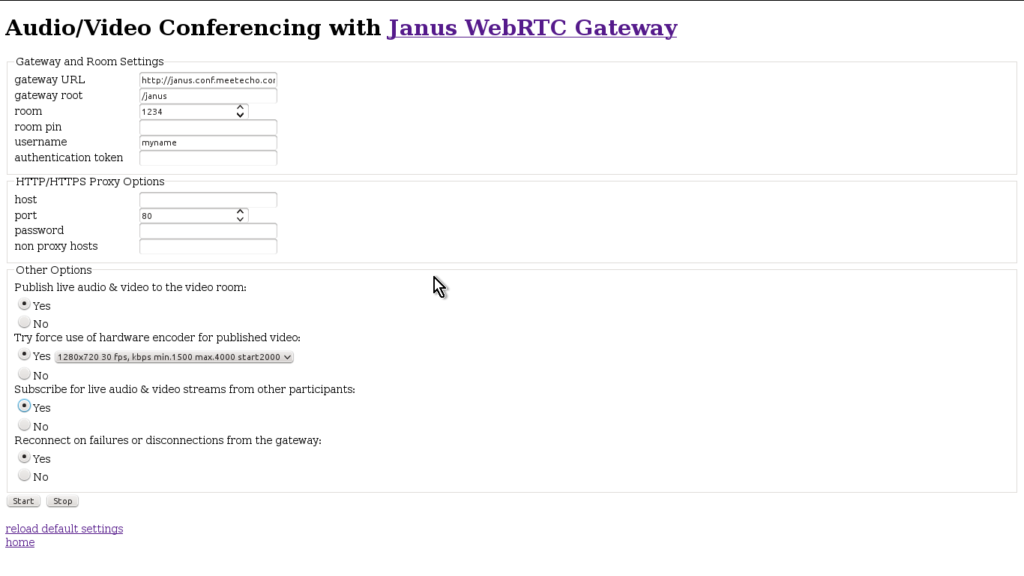
Unless it is specified otherwise, all the mandatory fields in the page (except username and few others probably) are filled automatically with some default values (which can be overridden from command line or in the configuration file) which allow you to quickly join the public video room on the Internet usually available from the official Janus website for demo/testing purposes.
The second way is to invoke the start/stop commands via HTTP/GET requests sent to the Streaming Server from command line. For example, to start a session by joining the default “1234” video room at the public Janus demo instance, type (in one line):
curl -s 'http://raspberrypi:port/janus?gateway_url=https://janus.conf.meetecho.com&gateway_root=/janus&room=1234&admin_key=&room_pin=&username=test&token=&proxy_host=&proxy_port=80&proxy_password=&proxy_bypass=&create_room=0&publish=1&vformat=60&hw_vcodec=0&subscribe=0&reconnect=1&action=Start' > /dev/null
where raspberrypi will have to be replaced with the real hostname of your Raspberry Pi in your network (it can be localhost if you are executing the command from within your Raspberry Pi) and port will have to be replaced with the real port number the Streaming Server is listening to (http and 8080 are the default).
This is a list of the parameters that can appear in the URL (those in bold are mandatory):
- gateway_url: URL of the Janus Gateway
- gateway_root: root on the gateway, type /janus if you do not know
- room: room number to join or create if it does not exist
- username: your preferred name in the room
- create_room: 1 try to create the room before joining, 0 for only joining an existing room
- admin_key: key that might be required by the Janus server to allow room creation
- room_pin: PIN if the room is protected;
- token: authentication token to be used for all the requests sent to the Janus Gateway
- publish: 1 if you want to broadcast your own audio/video to the room, 0 otherwise
- subscribe: 1 if you want to subscribe for other’s audio/video feeds, 0 otherwise
- hw_vcodec: 1 if you want to make use of hardware video codecs available on the device (e.g. H264 on the Rpi). The codec must be supported by the room.
- vformat: integer code specifying video resolution and frame rate (see the manual)
- reconnect: 1 to try to reconnect on unexpected disconnections, 0 otherwise
- proxy_host: optional HTTP proxy to use for the all requests to the Janus Gateway
- proxy_port
- proxy_password
- proxy_bypass
- action: Start or Stop to commit the parameters and to start or gracefully stop the session
Please read the uv4l-server manual for more informations on all the parameters that you are allowed to specify in the URL or in the UV4L configuration file (as default values). In the manual you will also find many others non Janus-specific options which can affect the streaming (one is example is the default video codec to use between VP8, VP9, hardware-encoded H264)
Similarly, to terminate a session in progress and leave the video room:
curl -s 'http://raspberrypi:8080/janus?action=Stop' > /dev/null
If you are protecting the UV4L Streaming Server with a password, then the above URL will not work. In this case, you must specify user and password in the URL as in the below example:
curl -s 'http://user:myp4ssw0rd@raspberrypi:8080/janus? [etc...]'
If the UV4L Streaming Server is providing HTTPS instead of HTTP, you will have to specify ‘https://[…]’ in the URLs and may also want to add the –insecure option to curl to turn off the verification of the server’s certificate (see curl manual for more details).